
Understanding the life and history of a historical artwork or artifact requires a keen eye and sophisticated tools. Conservators and art historians often face the challenge of discerning original artist intent from later alterations or repairs. This is where non-invasive analytical techniques become incredibly valuable, offering insights without causing any damage.
One such powerful method is UV fluorescence imaging, a technique that reveals hidden layers, material differences, and the nuanced history of an object. This approach offers a distinct advantage, providing crucial information about the composition and condition of precious cultural heritage.
By exposing an object to ultraviolet light and observing the emitted visible light, experts can gain a deeper understanding of its material makeup, identify areas of retouching, and map pigment distribution across surfaces. This process is a cornerstone of modern conservation science, guiding treatment decisions and informing scholarly research.
The Science of Fluorescence and Why Pigments Respond Differently to UV
Fluorescence is a fascinating physical phenomenon where a substance absorbs light at one wavelength and then re-emits it almost immediately at a longer, visible wavelength. In the context of art examination, we typically use long-wave ultraviolet (UV-A) light to excite materials on an artwork’s surface. The resulting visible light, or fluorescence, provides a unique fingerprint for various components.
Different materials within a painting—pigments, binders, varnishes, and even degradation products—possess distinct molecular structures that dictate their fluorescent behavior. Some materials absorb UV light and fluoresce brightly, while others absorb it and remain dark, effectively quenching any emitted light. This varied response is fundamental to interpreting UV images in UV fluorescence conservation.
Organic binders like natural resins or drying oils often exhibit strong fluorescence, changing in color and intensity as they age and oxidize. Inorganic pigments, on the other hand, can behave quite differently; some, like zinc white, fluoresce blue, while others, such as lead white, typically appear dark under UV light. This contrast helps distinguish between different types of white pigments, for instance.
The age of a material also plays a significant role in its fluorescent signature. Older varnishes and binders tend to fluoresce more intensely and with a yellow or green hue due to accumulated oxidation products over centuries. Newer materials, applied during restoration or later interventions, often have a different, less intense, or distinctively colored fluorescence, making retouching detection UV a reliable method.
Environmental factors like light exposure, humidity, and chemical reactions can also alter a material’s fluorescent properties, providing clues about its historical conditions. Understanding these responses allows conservators to build a comprehensive picture of an artwork’s material history and condition, using UV fluorescence imaging retouching pigment distribution to reveal hidden truths.
Equipment and Setup for UV Fluorescence Examination
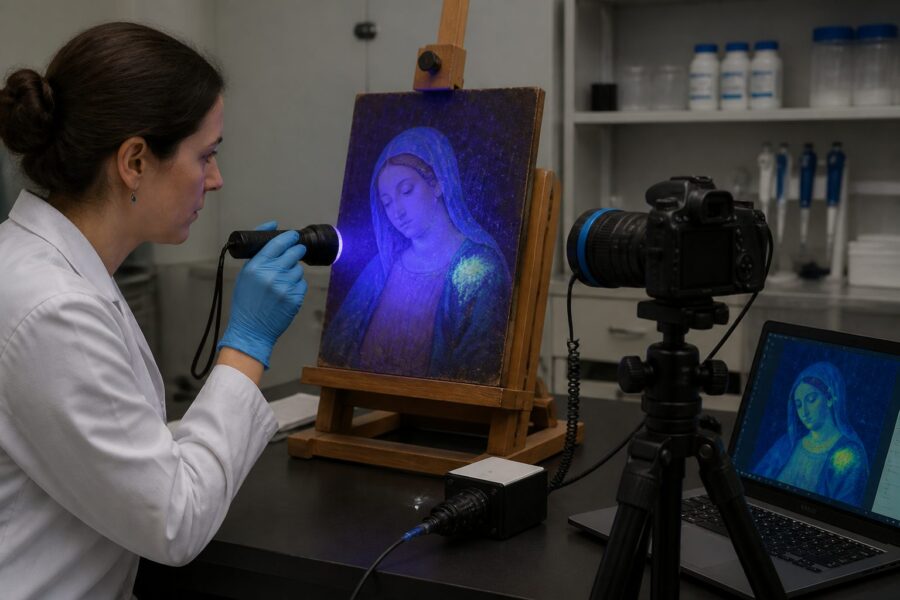
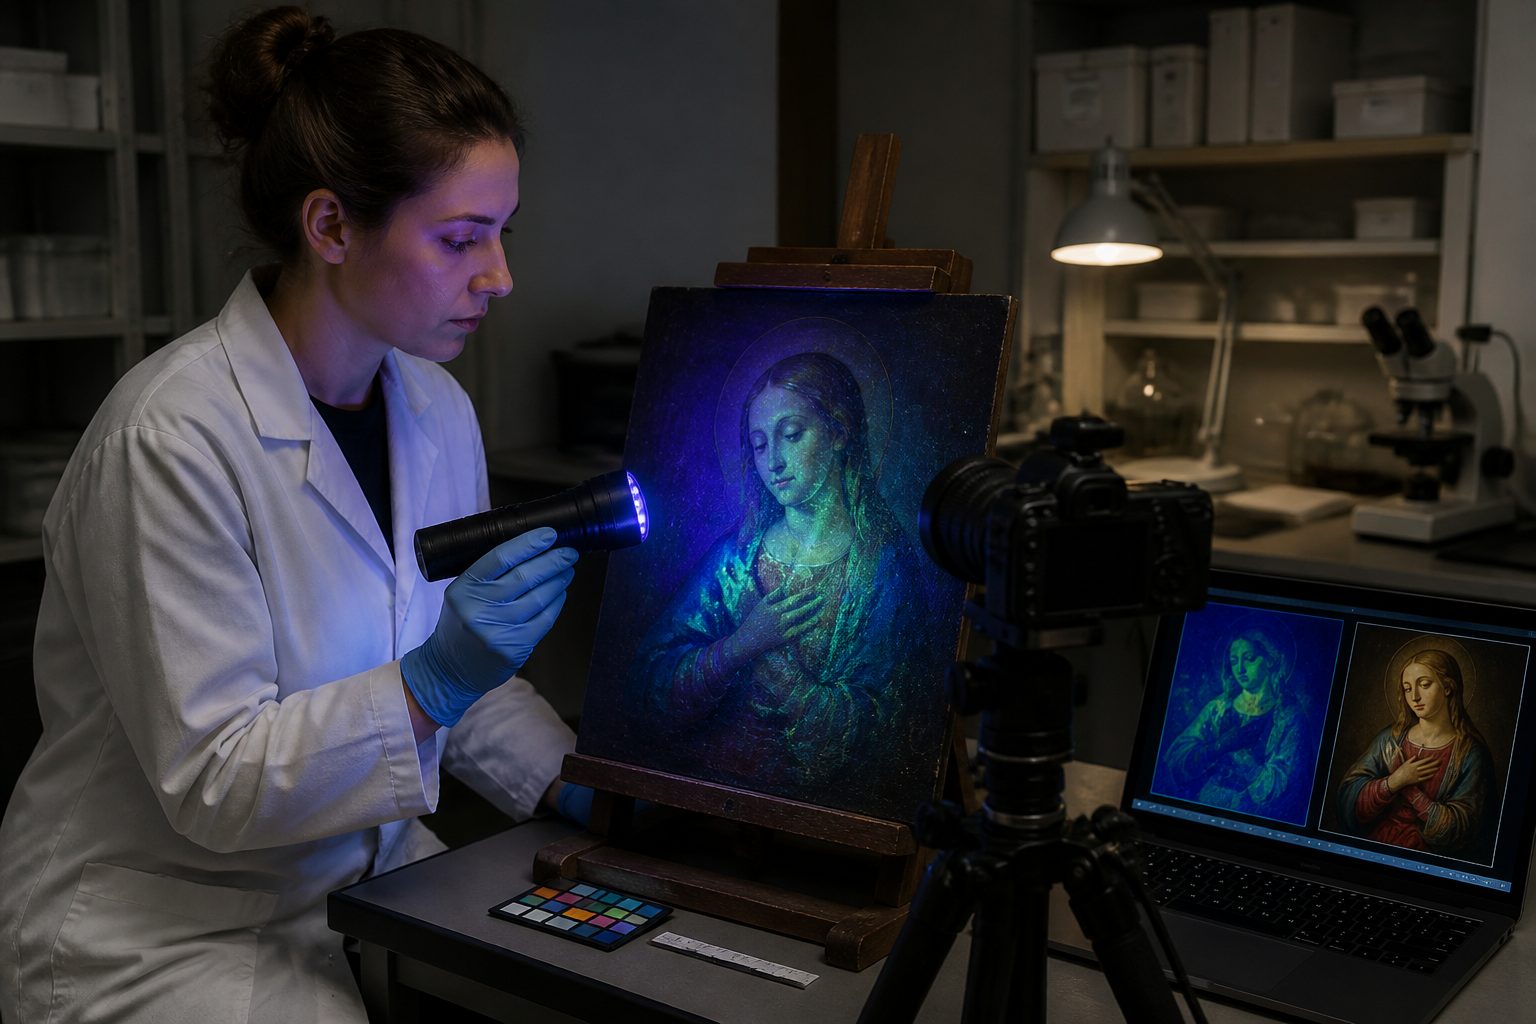
Effective UV fluorescence examination relies on specific equipment and a carefully controlled environment to achieve reliable results. The primary piece of equipment is a dedicated UV light source, typically emitting long-wave UV-A radiation between 365-370 nanometers, which is safe for most materials and human exposure with proper protection.
To capture the emitted fluorescence, a digital camera equipped with a barrier filter is essential; this filter blocks the reflected UV light and only allows the visible fluorescent light to reach the camera sensor. Working in a completely darkened room is also crucial, as any ambient visible light can interfere with the subtle fluorescence signals and compromise image quality. This controlled setup is key for successful ultraviolet art examination.
| Equipment Component | Primary Function | Key Considerations for Use |
|---|---|---|
| UV-A Lamp (365-370nm) | Emits long-wave ultraviolet radiation to excite materials. | Ensure even illumination; use multiple lamps for larger objects; wear UV protective eyewear. |
| Digital Camera (DSLR/Mirrorless) | Captures the visible light emitted by fluorescing materials. | High-resolution sensor, manual control over exposure settings, good low-light performance. |
| Barrier Filter (UV-cut filter) | Blocks reflected UV light, allowing only visible fluorescence to pass. | Essential for clear images; typically yellow or orange; specific filter choice depends on desired color rendition. |
| Tripod | Stabilizes the camera for long exposures, preventing blur. | Robust and adjustable to position the camera precisely relative to the artwork. |
| Darkroom Environment | Eliminates ambient visible light interference, enhancing fluorescence visibility. | Ensure complete darkness; cover windows and turn off all non-UV light sources. |
| Color Calibration Chart | Provides a reference for accurate color reproduction in images. | Photograph under UV illumination to establish a baseline for post-processing. |
Interpreting UV Images: What Dark Areas and Bright Areas Mean
Deciphering a UV fluorescence image requires a foundational understanding of how different materials interact with ultraviolet light. Generally, the intensity and color of the emitted fluorescence provide specific clues about the chemical composition and age of the object’s surface materials. A dark area in a UV image indicates that the material either does not fluoresce or actively absorbs the UV light without re-emitting visible light.
Conversely, bright areas signify strong fluorescence, meaning the material is efficiently absorbing UV light and emitting visible light. These bright spots often correspond to organic binders, varnishes, or specific pigments that have strong fluorescent properties. The color of this fluorescence, whether blue, green, yellow, or orange, adds another layer of diagnostic information for UV fluorescence imaging retouching pigment distribution.
For example, modern titanium white pigment typically appears dark under UV light, while older lead white also often appears dark, but with a slight purplish or reddish tinge if mixed with certain binders. Zinc white, a pigment used from the mid-19th century, frequently exhibits a distinct blue-white fluorescence, helping conservators date or identify specific interventions. This differentiation is a powerful aspect of retouching detection UV.
Varnishes are another key element to interpret; natural resin varnishes, like dammar or mastic, usually fluoresce with a yellow-green to orange glow, increasing in intensity and yellowing with age. Synthetic varnishes, often used in later restorations, typically show a brighter, more uniform, and sometimes blue-white fluorescence, providing a clear distinction. Such observations are invaluable for ultraviolet art examination.
Interpreting UV images also demands a comparative approach, often requiring side-by-side analysis with visible light images and the conservator’s direct observation of the artwork. Experience with a wide range of materials and their known UV responses is essential for accurate diagnosis. This systematic interpretation allows for a nuanced understanding of the artwork’s material history.
Identifying Areas of Retouching and Later Interventions
One of the most compelling applications of UV fluorescence imaging is its ability to reveal areas of past restoration and retouching, often invisible under normal visible light. These interventions, whether historical repairs or modern conservation efforts, leave tell-tale fluorescent signatures that stand out against the original surface. This makes UV fluorescence imaging retouching pigment distribution an indispensable tool for conservators.
Newer paint layers or fillings, especially those made with synthetic binders or modern pigments, frequently appear as distinct dark patches or areas of different fluorescence intensity and color. This contrast arises because the refractive index and chemical composition of the new materials differ significantly from the aged original paint layers. Such clear distinctions are what makes retouching detection UV so effective.
For example, a conservator might observe a brightly fluorescing older varnish covering the original painting, but then notice a dark, non-fluorescing area within it. This dark patch often indicates a later retouching applied over the original surface but beneath the varnish, or a modern fill material that does not fluoresce. These observations help reconstruct the artwork’s treatment history.
Older retouchings, while potentially more integrated visually, can still be distinguished by their different fluorescent response, which might vary slightly in color or intensity from the surrounding original paint. The binder used in the retouching, its age, and its interaction with the original surface all contribute to a unique UV signature. This information is critical for planning future conservation treatments.
By precisely mapping these areas of intervention, conservators can understand the extent of previous work, differentiate between original and added material, and make informed decisions about future restoration. This non-invasive insight saves time and minimizes the need for more invasive analytical techniques, preserving the artwork’s integrity. It provides a comprehensive view of the artwork’s material evolution.
Distinguishing Natural Resin Fluorescence From Synthetic Varnish
Differentiating between natural resin varnishes and synthetic varnishes is a frequent and important task in conservation, as each type behaves differently over time and requires distinct treatment approaches. UV fluorescence provides a powerful, non-invasive method for this distinction, offering clear visual cues. Natural resins like dammar, mastic, or copal display characteristic fluorescence patterns that evolve with age and oxidation.
Typically, older natural resin varnishes fluoresce with a distinct yellow-green or orange hue, often showing a granular or uneven texture under UV light, reflecting their aging process and application method. In contrast, synthetic varnishes, such as acrylics or ketone resins, usually present a more uniform, often blue-white or bright white fluorescence, which tends to be less affected by age and degradation. This clear difference is invaluable for ultraviolet art examination.
- Natural resin varnishes: Yellow-green to orange fluorescence.
- Natural resin varnishes: Often exhibit uneven or granular appearance.
- Natural resin varnishes: Fluorescence intensity increases and yellows with age.
- Synthetic varnishes: Typically display uniform blue-white or bright white fluorescence.
- Synthetic varnishes: Less color shift or intensity change over time.
- Synthetic varnishes: Can indicate more recent conservation interventions.
UV Fluorescence as a First Step Before Invasive Analysis
Conservation science prioritizes non-invasive methods whenever possible to protect the integrity of historical objects. UV fluorescence imaging consistently serves as an ideal preliminary examination, providing a wealth of information without requiring any physical interaction with the artwork. This initial assessment helps conservators develop a targeted strategy for further investigation, minimizing the need for destructive sampling.
By revealing areas of retouching, hidden layers, or material inconsistencies, UV fluorescence imaging retouching pigment distribution guides where more invasive techniques, such as micro-sampling for cross-sections or elemental analysis, might be most effective. This focused approach ensures that any samples taken are strategically chosen, maximizing the diagnostic value while preserving the artwork as much as possible. It is a critical first pass for any serious material study.
Imagine a scenario where a conservator suspects a specific pigment has been used in a repair; UV fluorescence can quickly confirm or deny the presence of a pigment with a known UV signature. If a particular area shows an anomalous fluorescence, it becomes a prime candidate for a tiny sample, rather than taking multiple samples from seemingly random locations. This precision saves time and resources.
This method drastically reduces the number of samples required, which is always a significant concern when dealing with irreplaceable historical artifacts. Each sample, no matter how small, represents a permanent alteration to the object. UV fluorescence conservation helps ensure that such alterations are made only when absolutely necessary and in the most informative locations.
Ultimately, incorporating UV fluorescence imaging into the initial stages of examination streamlines the entire conservation process. It provides a cost-effective and efficient way to gather comprehensive material data, informing both scientific analysis and practical treatment decisions. This strategic advantage makes it an indispensable tool in any conservation laboratory.
Documentation Standards and Integrating UV Images Into Conservation Reports
Thorough documentation is the backbone of responsible conservation practice, ensuring transparency, reproducibility, and a lasting record of an artwork’s condition and treatment. UV fluorescence images, with their capacity to reveal hidden information, are an essential component of this documentation. Proper standards for capturing and integrating these images into conservation reports are therefore paramount.
Each UV image must be meticulously recorded with accompanying metadata, including the date of capture, the specific UV light source used, camera settings (aperture, ISO, exposure time), and the type of barrier filter employed. Recording the exact orientation of the artwork and any scale bars or color charts within the frame ensures the image’s scientific integrity and interpretability for future reference. This detailed approach supports reliable ultraviolet art examination.
Integrating UV images into conservation reports elevates the quality and depth of the overall assessment. These images provide compelling visual evidence of observations such as retouching detection UV, pigment distribution, or varnish layers, which might be difficult to describe adequately with text alone. They offer a direct, visual narrative of the artwork’s material history, making the report more comprehensive and accessible.
It is also crucial to present UV images alongside corresponding visible light images, and potentially raking light or infrared images, to provide a complete context. This comparative display allows readers to easily cross-reference observations and fully understand how the UV fluorescence highlights specific features. Clear captions and annotations within the report should explain what each UV image reveals, pointing out significant areas of interest.
Finally, maintaining high-resolution archival copies of all UV images is essential for long-term preservation and future research. These digital assets contribute to a growing body of scientific data that can be used for comparative studies, material identification, and the ongoing advancement of conservation science. Consistent documentation strengthens the value of every UV fluorescence imaging retouching pigment distribution study.
Conclusion
UV fluorescence imaging stands as a truly remarkable and indispensable technique in the realm of art conservation and historical pigment analysis. Its non-invasive nature and ability to unveil hidden details make it a powerful tool for understanding the complex lives of artworks. This method offers unparalleled insights into an object’s material history and condition.
From identifying subtle areas of retouching and later interventions to distinguishing between various types of varnishes and mapping pigment distribution, UV fluorescence imaging retouching pigment distribution provides critical information for conservators and researchers alike. It empowers informed decision-making, guiding the most appropriate and respectful treatment strategies. The technique consistently reveals layers of history that are otherwise invisible.
As conservation science continues to evolve, the diagnostic power and efficiency of UV fluorescence imaging will undoubtedly remain a cornerstone of ethical and effective practice. This technology allows us to look beyond the surface, connecting us more deeply with the creators and custodians of our shared cultural heritage. It offers a clear path to preserving these treasures for generations to come.