Micro chemical tests pigment analysis offers a fascinating window into the world of historical artifacts. These techniques, though often requiring only minute samples, can unlock a wealth of information about the materials and methods used by artists and craftsmen throughout history.
By carefully observing the reactions of pigments with various reagents, conservators and scientists can identify the chemical composition of these materials. This knowledge is invaluable for understanding the provenance, dating, and condition of artworks, as well as for informing conservation strategies.
In this article, we will explore the principles behind micro chemical tests pigment identification, the methods for preparing samples, and some of the most common tests used in the field. We’ll also discuss the interpretation of results, the advantages and limitations of these techniques, and essential safety considerations for working with chemical reagents.
Understanding the Principles of Microchemical Testing
Microchemical testing relies on the fundamental principles of chemical reactions and qualitative analysis. The core idea is that different chemical compounds will react in predictable ways when exposed to specific reagents.
These reactions often manifest as visible changes, such as the formation of precipitates, changes in color, or the evolution of gases. By carefully observing these changes under a microscope, one can infer the presence of particular elements or compounds within the sample.
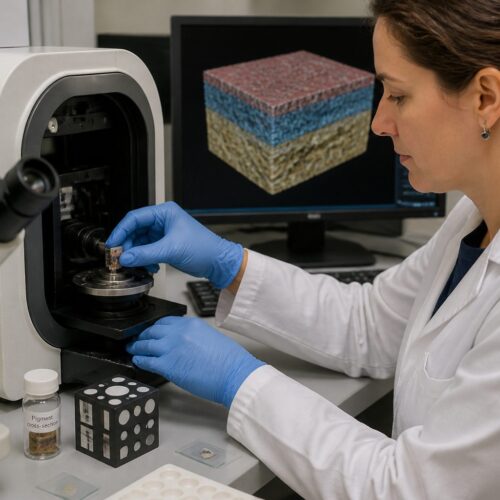
The reactions are typically carried out on a very small scale, often using only a few micrograms of sample. This is particularly important when dealing with historical artifacts, where destructive analysis must be kept to an absolute minimum.
Qualitative analysis, as the name suggests, focuses on identifying the components of a sample rather than quantifying their amounts. This contrasts with quantitative analysis, which aims to determine the exact concentration of each component.
The Role of Spot Tests in Pigment Analysis
Spot tests are a subset of microchemical tests that are particularly well-suited for pigment identification. These tests involve placing a small amount of pigment onto a filter paper or glass slide and then adding a drop of a specific reagent.
The reaction between the pigment and the reagent will often produce a characteristic colored spot or ring, which can be compared to known standards to identify the pigment. Spot tests are relatively simple to perform and require minimal equipment, making them a valuable tool for on-site analysis.
The choice of reagent is crucial for a successful spot test. Different reagents are designed to react with specific elements or compounds commonly found in pigments.
For example, a reagent containing potassium ferrocyanide can be used to detect the presence of iron, which is a key component of many earth pigments like ochre and umber. Similarly, a reagent containing hydrogen sulfide can be used to detect the presence of lead, which is found in pigments like lead white and Naples yellow.
Preparing Samples for Microchemical Analysis
Proper sample preparation is essential for obtaining reliable results from microchemical tests pigment analysis. The goal is to isolate a small, representative sample of the pigment material without introducing any contaminants.
This can be a delicate process, especially when dealing with fragile or degraded artifacts. The method of sample collection will depend on the nature of the artifact and the location of the pigment layer.
| Sample Type | Collection Method | Preparation Steps |
|---|---|---|
| Paint cross-section | Scalpel or micro-chisel | Mount in resin, microtome sectioning |
| Loose pigment | Fine brush or needle | Grinding (if necessary), dispersion in solvent |
| Surface scraping | Scalpel or glass fiber brush | Dissolution in appropriate solvent |
| Embedded pigment | Laser ablation, micro-drilling | Solvent extraction, filtration |
Once the sample has been collected, it may need to be further processed to remove any binding media or other interfering substances. This can involve techniques such as solvent extraction, dissolution, and filtration.
It’s important to document the entire sample preparation process meticulously, including the location of the sample, the method of collection, and any treatments applied. This will help to ensure the reproducibility of the results and allow for accurate interpretation of the data.
Common Reagents Used in Microchemical Tests
The selection of appropriate reagents is critical for successful micro chemical tests pigment analysis. Different reagents are designed to react with specific elements or compounds, producing characteristic visual changes that can be observed under a microscope.
Some of the most commonly used reagents in pigment analysis include hydrochloric acid (HCl), nitric acid (HNO3), sulfuric acid (H2SO4), and potassium hydroxide (KOH). These reagents are used to dissolve or break down the pigment material, allowing for the identification of its constituent elements.
Other reagents, such as potassium ferrocyanide (K4[Fe(CN)6]) and ammonium sulfide ((NH4)2S), are used to detect the presence of specific metals, such as iron and lead, respectively. These reagents react with the metal ions to form colored precipitates or complexes that can be easily identified.
In addition to these inorganic reagents, some organic reagents are also used in pigment analysis. For example, dimethylglyoxime (DMG) is used to detect the presence of nickel, while alizarin is used to detect the presence of aluminum.
Performing Common Microchemical Tests for Pigments
Once you’ve prepared your sample and gathered your reagents, it’s time to perform the microchemical tests. This involves carefully observing the reactions between the pigment and the reagents under a microscope.
One common test is the acid digestion test, where a small amount of pigment is treated with a drop of concentrated acid, such as hydrochloric acid or nitric acid. The reaction is observed under a microscope, looking for changes in color, the formation of gas bubbles, or the dissolution of the pigment particles.
Another common test is the flame test, where a small amount of pigment is introduced into a flame. The color of the flame can provide clues about the elemental composition of the pigment.
For example, copper compounds will produce a green or blue-green flame, while sodium compounds will produce a yellow flame. It’s important to use proper safety precautions when performing flame tests, as some pigments may release toxic fumes when heated.
Microchemical Spot Tests: A Practical Guide
Microchemical spot tests are a quick and easy way to identify pigments. They rely on the principle that certain pigments will react with specific reagents to produce a colored spot or ring on filter paper.
To perform a spot test, place a small amount of the pigment sample on a piece of filter paper. Add a drop of the appropriate reagent to the pigment and observe the reaction.
- For iron-based pigments, use potassium ferrocyanide
- For copper-based pigments, use rubeanic acid
- For mercury-based pigments, use tin(II) chloride
- For lead-based pigments, use sodium sulfide
- For calcium-based pigments, use ammonium oxalate
The color and shape of the spot can provide valuable information about the identity of the pigment. It’s important to compare the results with known standards to ensure accurate identification.
Always use high-quality filter paper and reagents for spot tests. Contaminated materials can lead to inaccurate results.
Interpreting Results and Identifying Pigments
Interpreting the results of micro chemical tests pigment analysis requires a combination of chemical knowledge, careful observation, and reference materials. The key is to correlate the observed reactions with the known properties of different pigments.
For example, if a pigment sample dissolves in hydrochloric acid and produces a green solution, it may contain copper. If the solution then reacts with potassium ferrocyanide to form a brown precipitate, this further supports the presence of copper.
It’s important to consider the possibility of pigment mixtures when interpreting results. Many historical pigments were not pure substances but rather mixtures of different materials.
In such cases, the microchemical tests may reveal the presence of multiple elements or compounds, requiring a more nuanced interpretation. Comparing the results with reference materials, such as pigment charts and databases, can be helpful in identifying the individual components of the mixture.
Using Reference Materials for Accurate Identification
Reference materials are essential for accurate pigment identification. These materials provide a baseline for comparison, allowing you to match the results of your microchemical tests with known standards.
Pigment charts are a valuable resource, providing visual examples of how different pigments react with various reagents. These charts often include detailed descriptions of the color changes, precipitate formation, and other characteristic reactions.
Pigment databases, such as the Infrared and Raman Users Group (IRUG) database, contain spectroscopic data for a wide range of pigments. This data can be used to confirm the identity of a pigment based on its unique spectral fingerprint.
In addition to these published resources, it can be helpful to create your own reference collection of known pigments. By performing microchemical tests on these known samples, you can gain firsthand experience with the characteristic reactions of different pigments.
Advantages and Limitations of Microchemical Tests
Microchemical tests offer several advantages for pigment analysis, particularly when dealing with historical artifacts. The most significant advantage is the small sample size required.
This makes it possible to analyze pigments without causing significant damage to the artwork. Microchemical tests are also relatively inexpensive and can be performed with basic laboratory equipment.
However, microchemical tests also have some limitations. They are primarily qualitative, meaning they can identify the presence of certain elements or compounds but not quantify their amounts.
The accuracy of microchemical tests depends heavily on the skill and experience of the analyst. The interpretation of results can be subjective, and it’s important to use reference materials to ensure accurate identification.
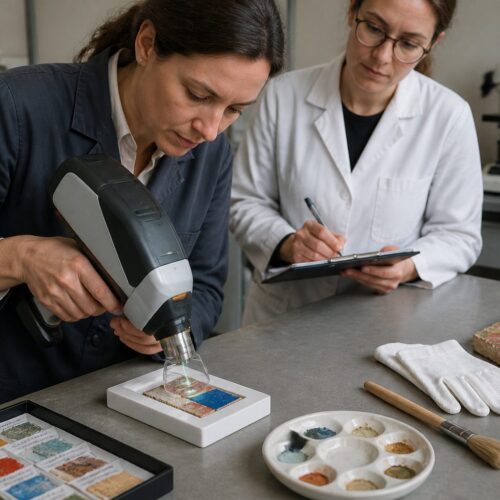
Complementary Techniques for Pigment Analysis
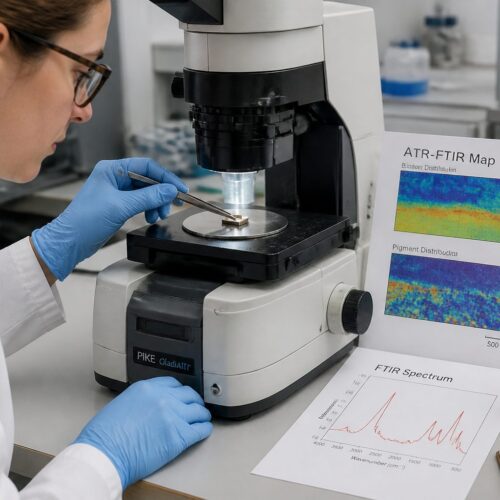
While micro chemical tests pigment analysis can provide valuable information, they are often used in conjunction with other analytical techniques to obtain a more complete picture of the pigment composition. Some of the most common complementary techniques include X-ray fluorescence (XRF), Raman spectroscopy, and Fourier transform infrared spectroscopy (FTIR).
XRF is a non-destructive technique that can identify the elemental composition of a pigment. It is particularly useful for detecting heavy metals, such as lead, mercury, and copper.
Raman spectroscopy and FTIR are vibrational spectroscopic techniques that can provide information about the molecular structure of a pigment. These techniques are particularly useful for identifying organic pigments and distinguishing between different polymorphs of the same pigment.
By combining the results of microchemical tests with data from these complementary techniques, conservators and scientists can gain a more comprehensive understanding of the materials used in historical artifacts.
Safety Considerations for Using Chemical Reagents
Working with chemical reagents requires careful attention to safety. Many of the reagents used in microchemical tests are corrosive, toxic, or flammable.
It’s essential to wear appropriate personal protective equipment (PPE), including gloves, safety glasses, and a lab coat, when handling these chemicals. Always work in a well-ventilated area, preferably under a fume hood, to avoid inhaling hazardous vapors.
When diluting acids, always add the acid to the water slowly and with stirring to avoid generating excessive heat. Never mix incompatible chemicals, such as acids and bases, as this can cause violent reactions.
Dispose of chemical waste properly, following all local, state, and federal regulations. Consult the safety data sheets (SDS) for each chemical to understand its hazards and proper handling procedures.
Documenting Your Microchemical Analysis
Careful documentation is essential for any scientific analysis, and microchemical tests are no exception. A detailed record of your procedures, observations, and interpretations will ensure the reliability and reproducibility of your results.
Start by recording the provenance of the sample, including the artifact it was taken from, its location on the artifact, and the date of collection. Describe the sample preparation process in detail, noting any solvents or treatments used.
For each microchemical test, record the reagent used, the reaction conditions (e.g., temperature, concentration), and your observations under the microscope. Include photographs or sketches of the reactions to provide a visual record of your findings.
Finally, document your interpretation of the results, citing any reference materials or databases used to support your conclusions. By maintaining a thorough and accurate record of your microchemical analysis, you can ensure that your work is both credible and valuable to the field of art conservation.
Conclusion
Micro chemical tests pigment analysis remains a valuable tool for conservators and scientists studying historical artifacts. While these techniques have limitations, their ability to provide information from minute samples makes them indispensable for understanding the materials and methods of the past.
By combining microchemical tests with complementary analytical techniques and careful documentation, we can continue to unlock the secrets held within these precious objects. This will help ensure their preservation for future generations.